
使用Hugo/theme:Stack + Github Pages 快速搭建个人博客网站,足够轻量,包含最新特性,快速上手,记录一些容易踩的坑。
注意:若您将本博客作为您的部署参考指南,默认您拥有一枚可用的Github账号,了解git,bash/shell常用指令,且您的本机运行环境中已预先安装hugo脚手架。本篇博客的行内指令若无特殊说明,均在站点根目录下执行,请注意区别。
| ID | Content |
|---|---|
| OS | Windows |
| hugo version | hugo v0.88.1-5BC54738+extended |
| hugo theme | hugo-theme-Stack v3.2.0 |
Quick Start
Preview
我们需要知道当前版本中的 Github Pages 能创建在你的任意一个 Github Project 之上,而非一定要在yourname.github.io上创建。但无论是哪种创建方式,都要遵守相应的部署规则,才能不报错,不出现路径定位异常等问题。
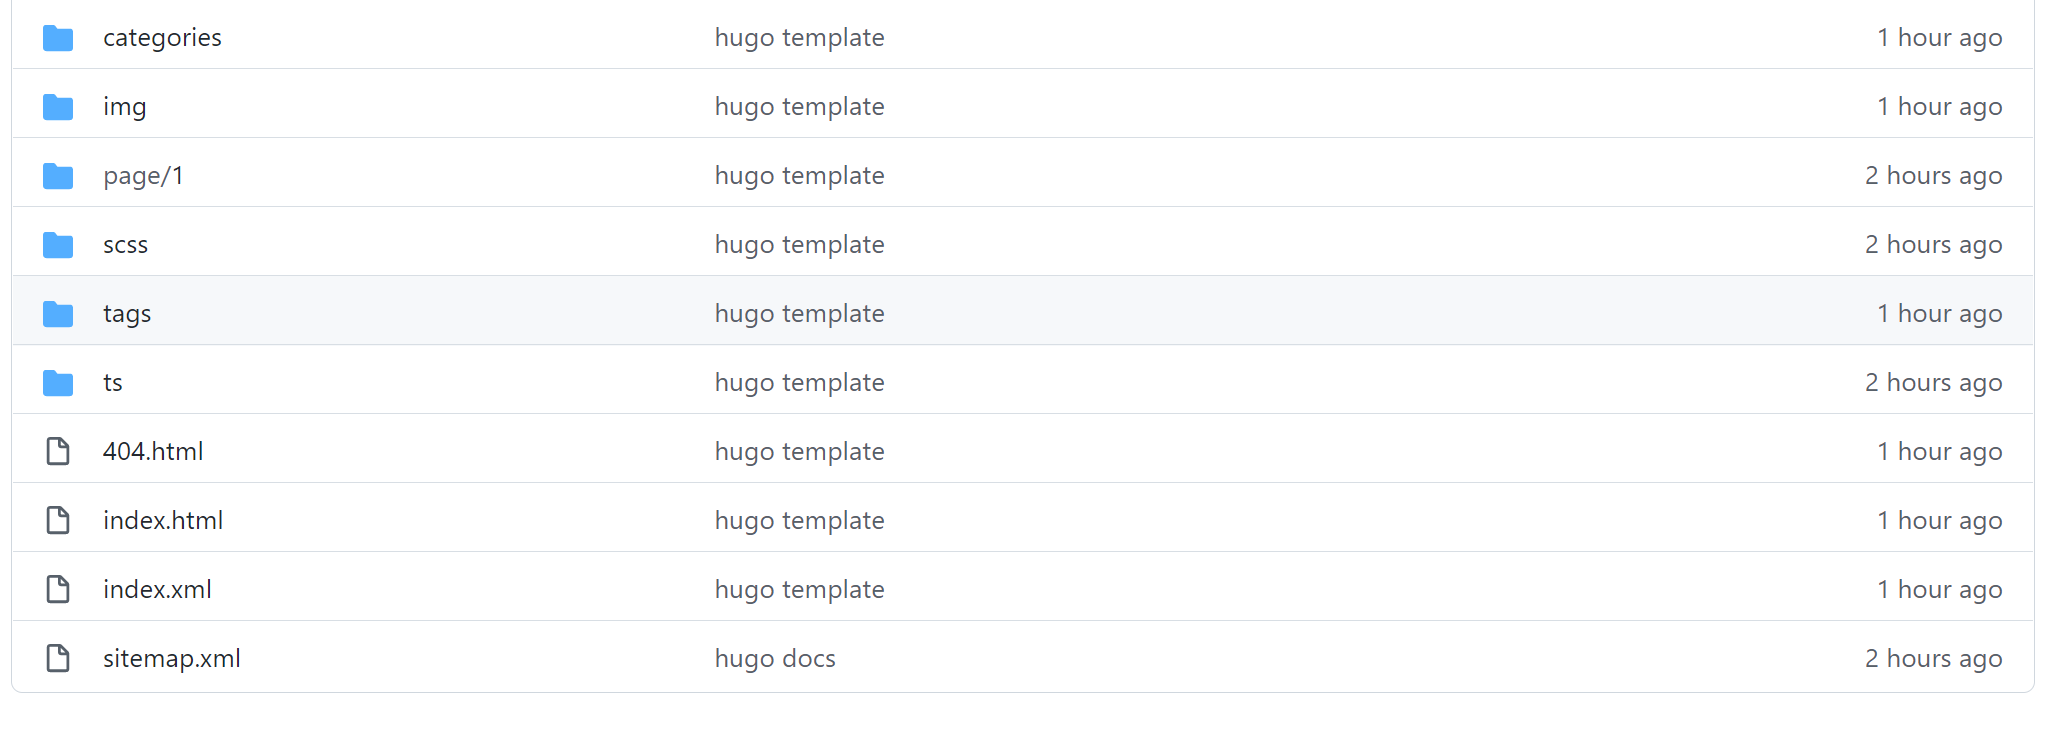
其次,Github Pages 默认以你的 Project Repository 为项目根,意味着你部署 Github Pages 的仓库首页应该存在如index.html,404.html等站点文件,参考组织结构如下图所示。
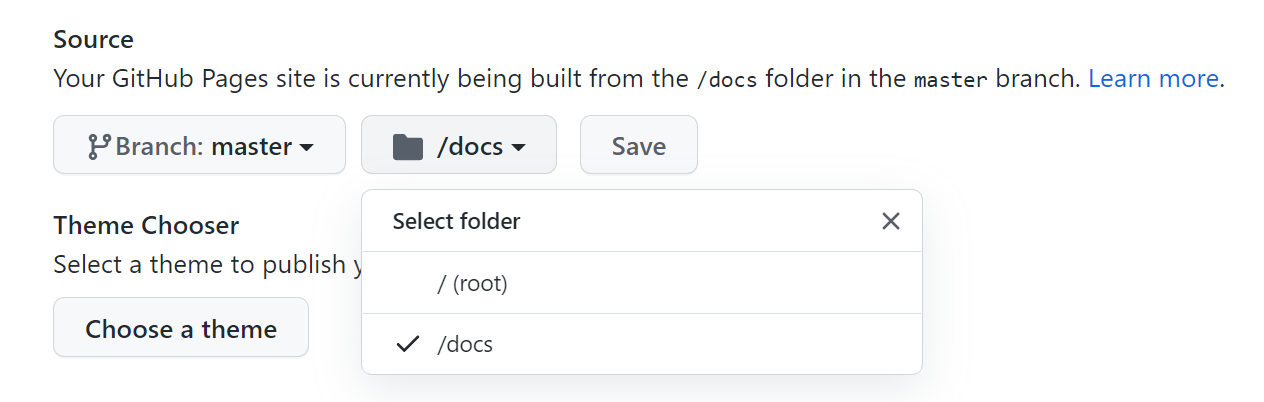
显然,此处的“仓库首页”是你的 Pages 指向的 folder ,如下图所示。
举个例子,你的用户名叫 xiaoming,你创建了一个仓库叫 APIs-docs,那么你的仓库链接是https://github.com/xiaoming/apis-docs(大小写不敏感)。
此时如果你的
Select folder = /(root),那么你直接访问上文所述仓库链接后,能直接在当前页面中看到index.html等文件。同理,
Select folder = /docs,那么你访问链接https://github.com/xiaoming/apis-docs/docs后,也能在当前页面中看到index.html等文件,也即项目源码中需要有这么个一个/docs文件夹存放渲染好的站点信息。
这个 folder 非常关键,其为 hugo 的编译输出文件夹,也即配置文件中 publishDir 变量指明的相对路径,后文详细说明。
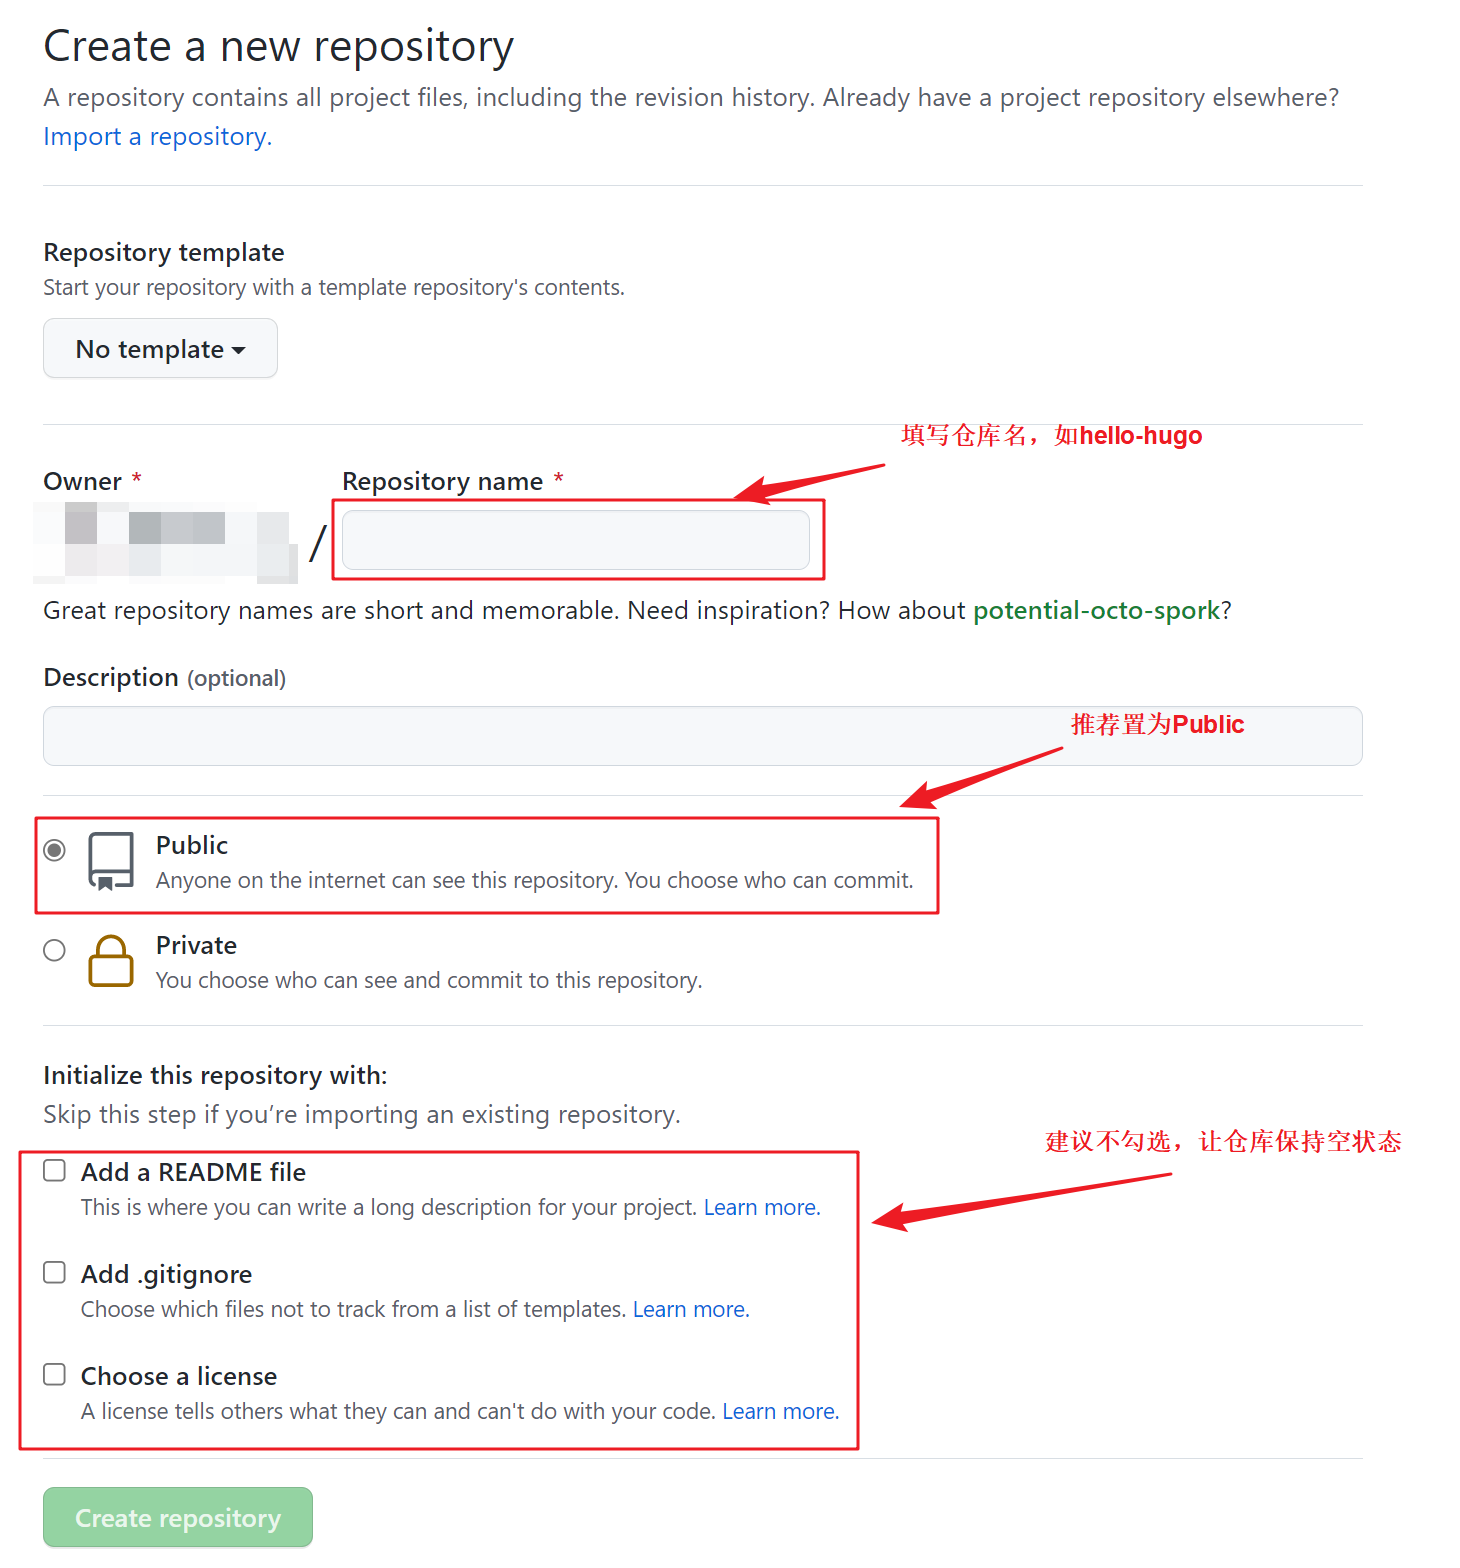
New Repository
用你喜欢的方式创建一个仓库(Public)。
不建议初始化任何文件,这可能会造成不可预估的版本冲突问题,如果你想添加
README.md什么的,完全可以在你的站点部署成功后手动创建。本篇博客创建的demo不勾选初始化,若您实际操作与本步骤不符,请于后续步骤中选择对应的解决方案。
Hugo Scaffold
New Site
此阶段使用脚手架迅速构建 hugo 项目并创建默认的目录结构。
找个比较可靠的位置启动你熟悉的CLI App(Terminal/bash/powershell),按步骤执行如下指令。
创建名为
hello-hugo的站点# yaoqinse@LAPTOP-29FRT6FJ MINGW64 /e/_GithubProjects/myProfile $ hugo new site hello-hugo Congratulations! Your new Hugo site is created in E:\_GithubProjects\myProfile\hello-hugo. Just a few more steps and you're ready to go: 1. Download a theme into the same-named folder. Choose a theme from https://themes.gohugo.io/ or create your own with the "hugo new theme <THEMENAME>" command. 2. Perhaps you want to add some content. You can add single files with "hugo new <SECTIONNAME>\<FILENAME>.<FORMAT>". 3. Start the built-in live server via "hugo server". Visit https://gohugo.io/ for quickstart guide and full documentation.进入站点根目录
# yaoqinse@LAPTOP-29FRT6FJ MINGW64 /e/_GithubProjects/myProfile
$ cd hello-hugo/
打印站点根目录下的文件
# yaoqinse@LAPTOP-29FRT6FJ MINGW64 /e/_GithubProjects/myProfile/hello-hugo
$ ls

archetypes/  config.toml  content/  data/  layouts/  static/  themes/
此时一个完整的 hugo 项目已经创建完毕,现在需要修改配置文件,使其兼容 Github Pages 部署规则。
Update Configuration
此阶段以demo的形式说明
Hugo + Github Pages技术栈的核心配置。
以你喜欢的方式打开~/hello-hugo/config.toml(也可能是其他后缀的配置文件,遵循对应的语法规则既可)并将其中的内容作如下更新:
baseurl = "https://yourname.github.io/hello-hugo"
publishDir = "docs"
全局变量 publishDir 指明 hugo 的编译输出目录,其路径默认在站点根目录下(~/hello-hugo/),hugo 以此为根生成的静态站点。
我们需要将 publishDir 与 Github Pages 的 folder 对应, folder 是 Github Pages 的渲染根目录。
- 注意:请替换这里的
yourname为你的Github UserName,此处我们还没有拉取任何的主题,不需要跟着其他教程设置变量theme。 - 注意:本博客选用
folder = “/docs”策略,需要添加publishDir = "docs",反之则不需要添加此行代码。值得一提的是,Github Pages 的执行根只有/(root)和/docs两个选项,也即此处的 publishDir 要么不写(以./public为项目根),要么只能写 docs。
Remote Origin
此阶段通过Git命令将 Hugo(本地文件) 与 Github Pages (远程仓库)组织结构对接。
还记得我们刚创建的 Repository 吗? 它的仓库链接是 https://github.com/yourname/hello-hugo.git,同样,你需要更换此处的yourname。
按序执行如下指令,实现上下文对接两个强大的技术栈!
初始化 Git 环境
# yaoqinse@LAPTOP-29FRT6FJ MINGW64 /e/_GithubProjects/myProfile/hello-hugo
$ git init

Initialized empty Git repository in E:/_GithubProjects/myProfile/hello-hugo/.git/
链接远程仓库
若您初次使用bash-git,需要进行身份验证。此处没有返回值说明操作成功。
# yaoqinse@LAPTOP-29FRT6FJ MINGW64 /e/_GithubProjects/myProfile/hello-hugo (master)
$ git remote add origin https://github.com/qin2dim/hello-hugo.git
创建主分支
因为此demo创建时不勾选初始化,默认情况下是没有分支的,需要手动创建。通过如下指令创建分支
main,并将其设为默认分支。# yaoqinse@LAPTOP-29FRT6FJ MINGW64 /e/_GithubProjects/myProfile/hello-hugo (master) $ git branch -M main标注更改内容并创建 commit 缓存
# yaoqinse@LAPTOP-29FRT6FJ MINGW64 /e/_GithubProjects/myProfile/hello-hugo (master)
$ git add .

# yaoqinse@LAPTOP-29FRT6FJ MINGW64 /e/_GithubProjects/myProfile/hello-hugo (master)
$ git commit -m "committing hugo template"

[master (root-commit) 4e0cab8] committing hugo template
 2 files changed, 9 insertions(+)
 create mode 100644 archetypes/default.md
 create mode 100644 config.toml
将标注信息推送至远程仓库
# yaoqinse@LAPTOP-29FRT6FJ MINGW64 /e/_GithubProjects/myProfile/hello-hugo (main)
$ git push -u origin main

Enumerating objects: 5, done.
Counting objects: 100% (5/5), done.
Delta compression using up to 16 threads
Compressing objects: 100% (4/4), done.
Writing objects: 100% (5/5), 483 bytes | 241.00 KiB/s, done.
Total 5 (delta 0), reused 0 (delta 0), pack-reused 0
remote: This repository moved. Please use the new location:
remote:   https://github.com/QIN2DIM/hello-hugo.git
To https://github.com/qin2dim/hello-hugo.git
 * [new branch]      main -> main
Branch 'main' set up to track remote branch 'main' from 'origin'.
查看远程仓库
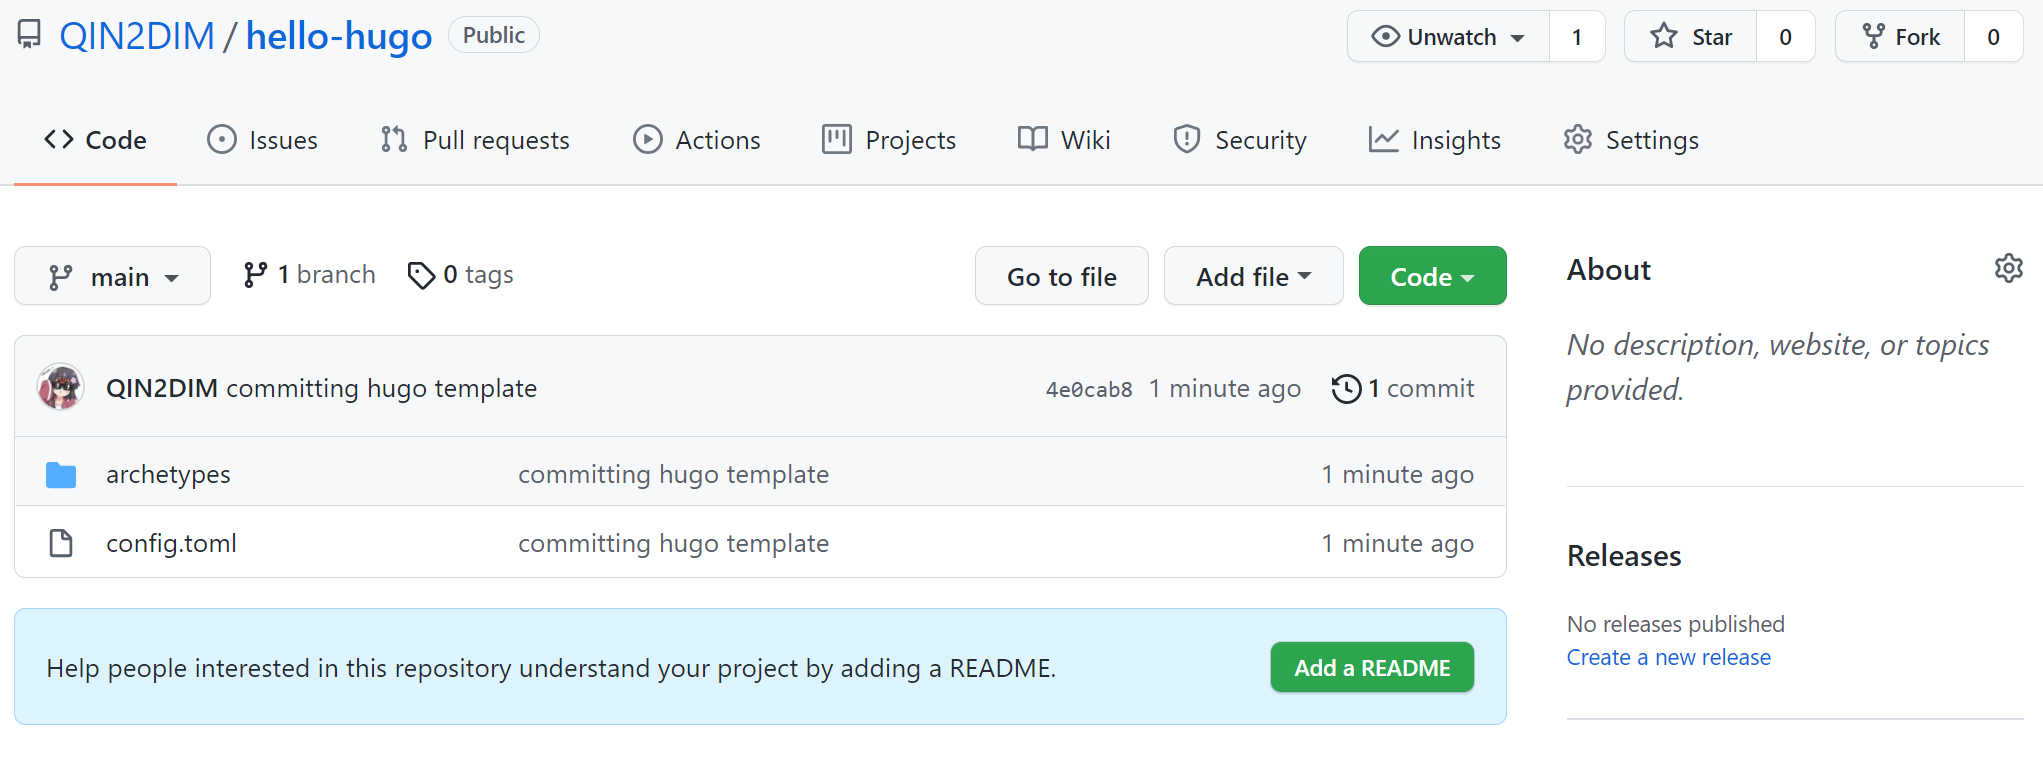
若您按照如上所述步骤操作,此时打开你的远程仓库,能看到如下目录结构。
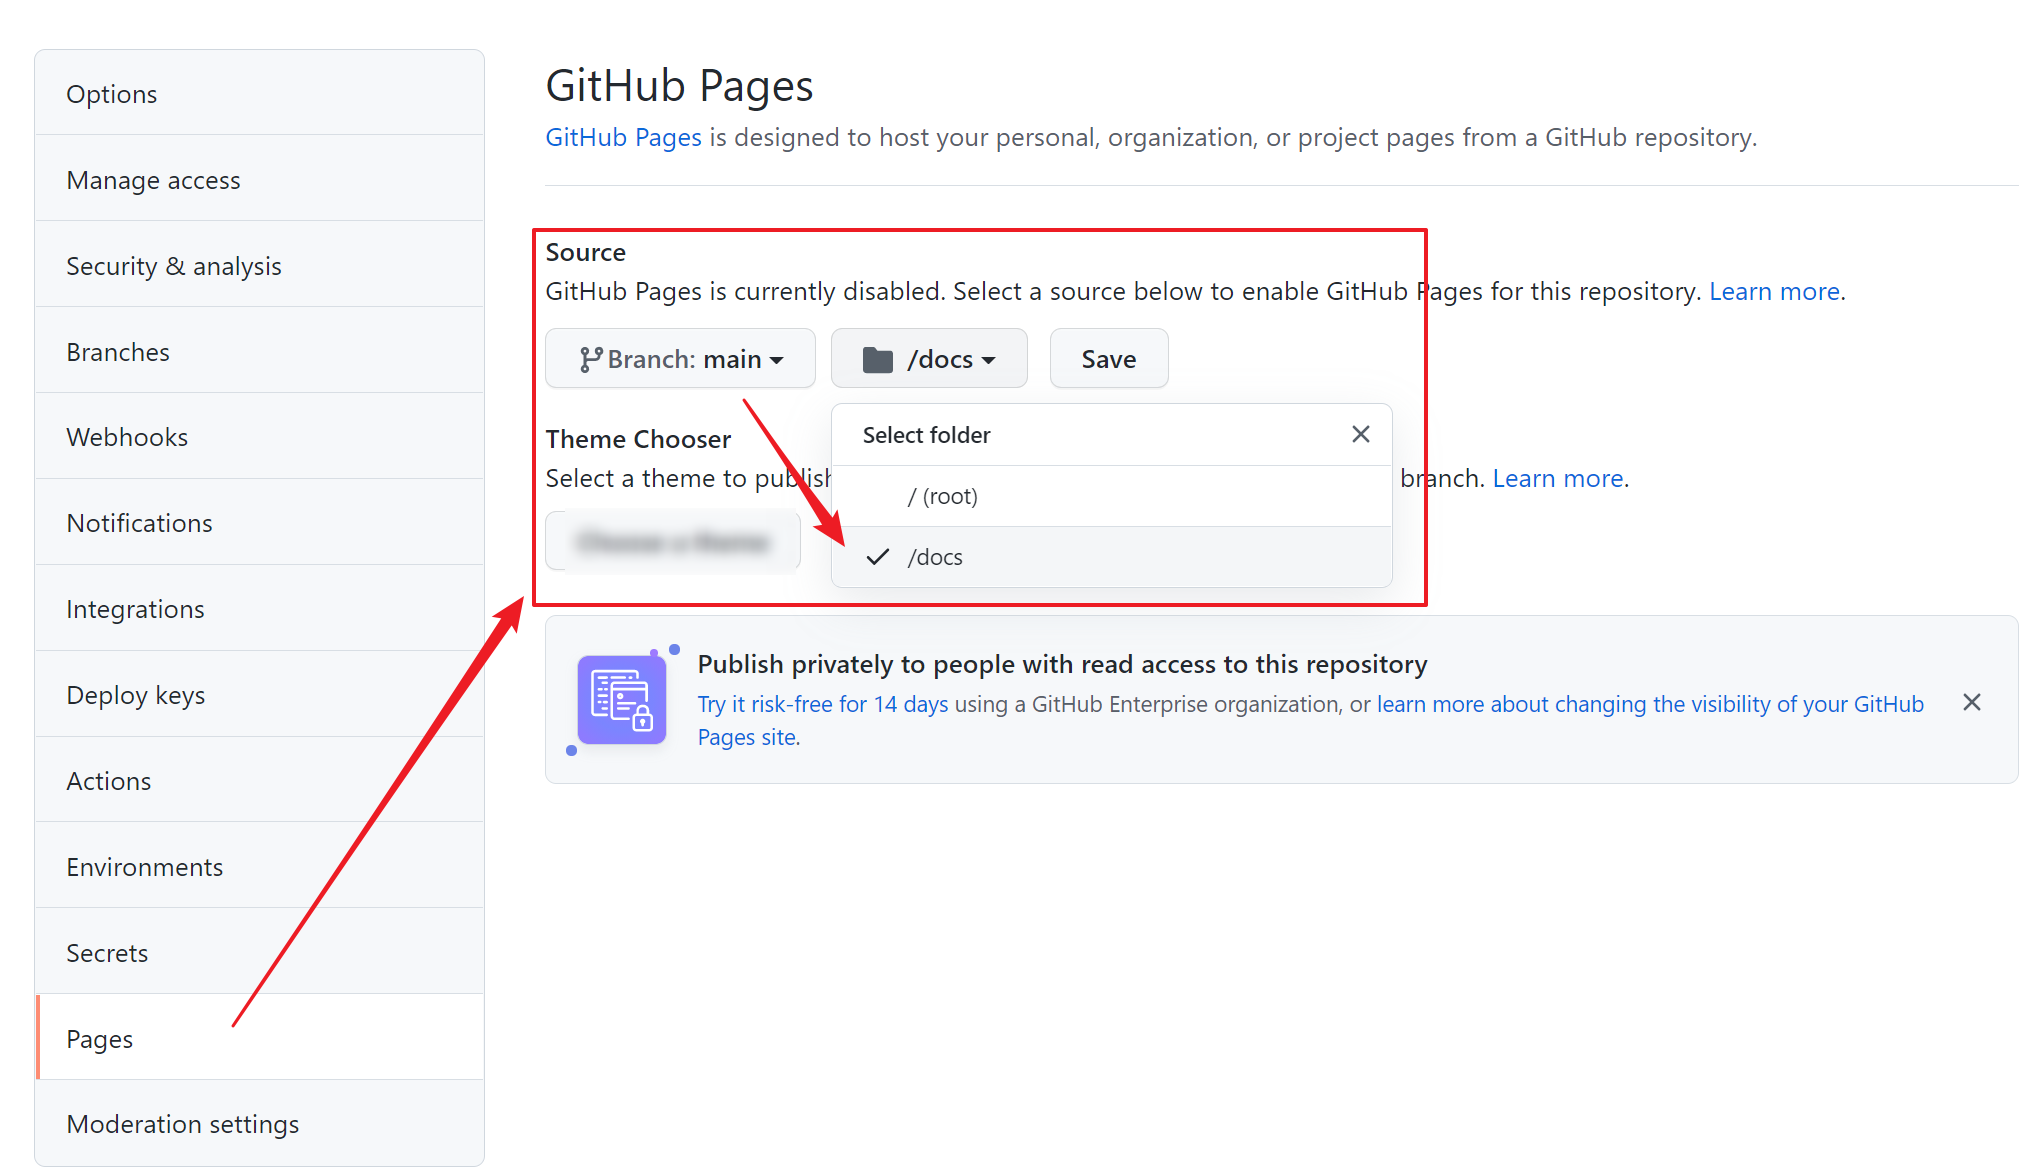
Select Folder
访问https://github.com/yourname/hello-hugo/settings/pages指定你的运行根,记得保存设置。本博客指定/docs。
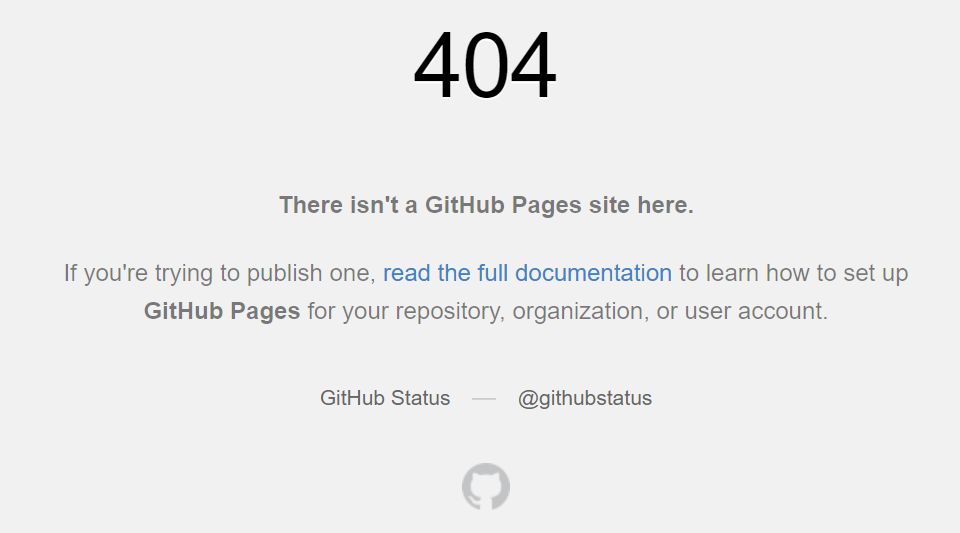
不要着急,到此为止您的站点还无法访问,若您兴致勃勃地启动https://yourname.github.io/hello-hugo,你会看到如下经典一幕。
Hugo PublishDir
回到我们的本地操作环境,是不是感觉少了点什么?是的,还记得我们一开始提到 Github Pages 的渲染首页么?index.html去哪里了?既然不在首页,那也应该在./docs 里呀(若不指定config.toml中的变量publishDir,则默认为./public)
是的,到此为止我们仅仅是创建了hugo的项目目录,但仍未进行hugo项目的初始化(首次构建)。
执行如下命令编译你的Hugo:
# yaoqinse@LAPTOP-29FRT6FJ MINGW64 /e/_GithubProjects/myProfile/hello-hugo (main)
$ hugo

Start building sites …
hugo v0.88.1-5BC54738+extended windows/amd64 BuildDate=2021-09-04T09:39:19Z VendorInfo=gohugoio
WARN 2021/09/20 02:29:00 found no layout file for "HTML" for kind "home": You should create a template file which matches Hugo Layouts Lookup Rules for this combination.
WARN 2021/09/20 02:29:00 found no layout file for "HTML" for kind "taxonomy": You should create a template file which matches Hugo Layouts Lookup Rules for this combination.
WARN 2021/09/20 02:29:00 found no layout file for "HTML" for kind "taxonomy": You should create a template file which matches Hugo Layouts Lookup Rules for this combination.

                   | EN
-------------------+-----
  Pages            |  3
  Paginator pages  |  0
  Non-page files   |  0
  Static files     |  0
  Processed images |  0
  Aliases          |  0
  Sitemaps         |  1
  Cleaned          |  0

Total in 57 ms
打印目录:
# yaoqinse@LAPTOP-29FRT6FJ MINGW64 /e/_GithubProjects/myProfile/hello-hugo (main)
$ ls
archetypes/  content/  docs/     resources/  themes/
config.toml data/ layouts/ static/这不来了嘛,./docs目录出现了,我们打印一下这个此目录的内容看看。
# yaoqinse@LAPTOP-29FRT6FJ MINGW64 /e/_GithubProjects/myProfile/hello-hugo (main)
$ ls ./docs

categories/ index.xml sitemap.xml tags/咦,怎么只有index.xml,后缀不太对,不要着急,我们还没有配置任何Hugo主题。
我们尝试将更改推送至远程仓库,看看情况对不对。
# yaoqinse@LAPTOP-29FRT6FJ MINGW64 /e/_GithubProjects/myProfile/hello-hugo (main)
$ git add .

# yaoqinse@LAPTOP-29FRT6FJ MINGW64 /e/_GithubProjects/myProfile/hello-hugo (main)
$ git commit -m "hugo init"

[main 7301327] hugo init
 4 files changed, 41 insertions(+)
 create mode 100644 docs/categories/index.xml
 create mode 100644 docs/index.xml
 create mode 100644 docs/sitemap.xml
 create mode 100644 docs/tags/index.xml

# yaoqinse@LAPTOP-29FRT6FJ MINGW64 /e/_GithubProjects/myProfile/hello-hugo (main)
$ git push -u origin main

Enumerating objects: 10, done.
Counting objects: 100% (10/10), done.
Delta compression using up to 16 threads
Compressing objects: 100% (7/7), done.
Writing objects: 100% (9/9), 1.12 KiB | 381.00 KiB/s, done.
Total 9 (delta 2), reused 0 (delta 0), pack-reused 0
remote: Resolving deltas: 100% (2/2), done.
remote: This repository moved. Please use the new location:
remote:   https://github.com/QIN2DIM/hello-hugo.git
To https://github.com/qin2dim/hello-hugo.git
   b233f02..7301327  main -> main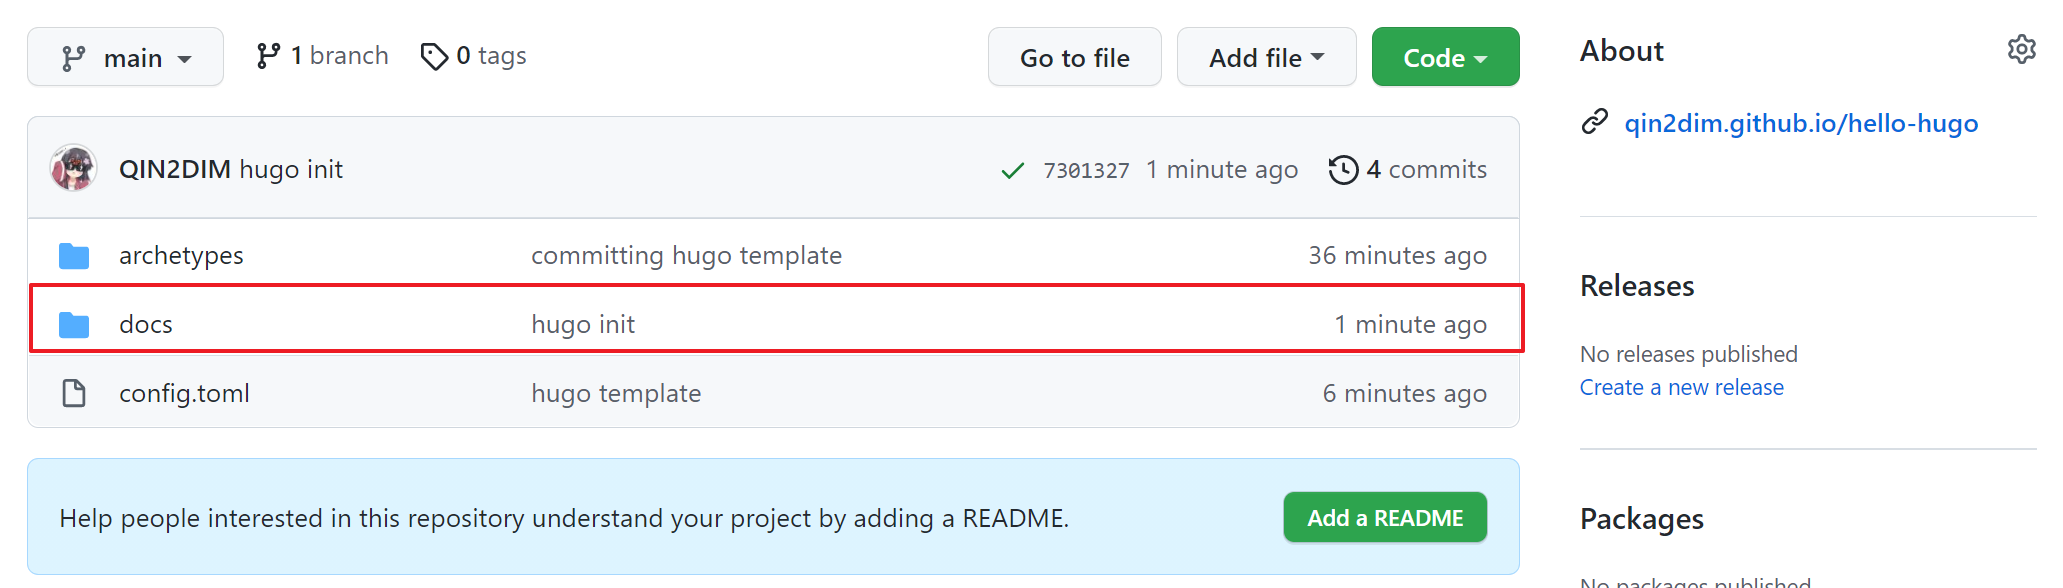
Branch 'main' set up to track remote branch 'main' from 'origin'.访问你的项目仓库,发现高贵的./docs文件出现了!
访问你的站点网址https://yourname.github.io/hello-hugo,你会发现这里不再404,渲染出来的是XML文档信息。
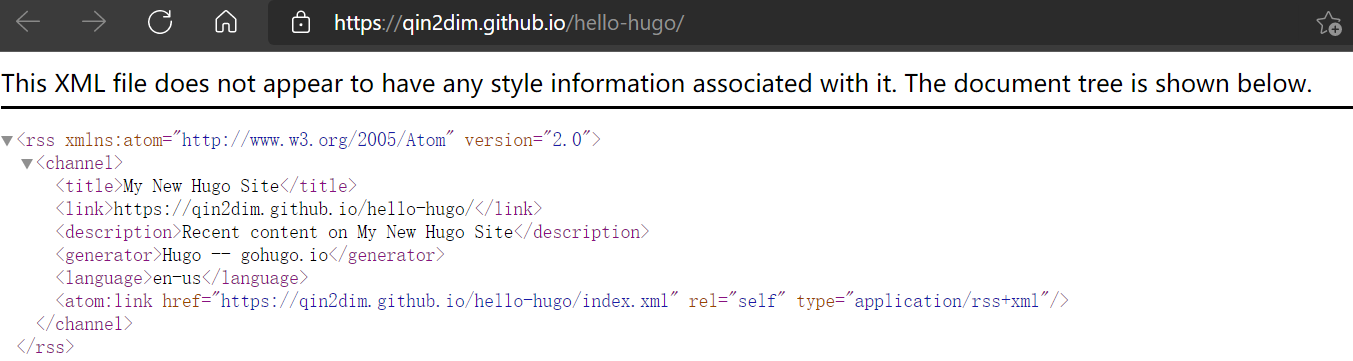
至此,你的 Hugo + Github Pages 技术栈已经构建完毕,接下来我们要为站点配置主题,也是注入灵魂的部分。本篇博客选用的演示主题为Hugo/theme:Stack。
Match theme
此阶段以 Hugo/theme:Stack 为demo说明如何将站点可视模块渲染出来,也是整个构建过程最关键的步骤之一。
拉取主题文件
为了方便使用Git来管理Hugo站点的源文件,我们需要将主题添加为 Submodule:
git submodule add https://github.com/CaiJimmy/hugo-theme-stack/ themes/hugo-theme-stack执行日志如下:
# yaoqinse@LAPTOP-29FRT6FJ MINGW64 /e/_GithubProjects/myProfile/hello-hugo (main)
$ git submodule add https://github.com/CaiJimmy/hugo-theme-stack/ themes/hugo-theme-stack

Cloning into 'E:/_GithubProjects/myProfile/hello-hugo/themes/hugo-theme-stack'...
remote: Enumerating objects: 3085, done.
remote: Counting objects: 100% (1000/1000), done.
remote: Compressing objects: 100% (405/405), done.
remote: Total 3085 (delta 782), reused 667 (delta 587), pack-reused 2085
Receiving objects: 100% (3085/3085), 836.78 KiB | 3.17 MiB/s, done.
Resolving deltas: 100% (1944/1944), done.
如果是第一次使用本主题,建议把
exampleSite文件夹中的config.yaml和主题目录下的assets复制到站点目录下。前者是 Hugo 站点的配置文件,已经写入了主题的可配置字段。cp ./themes/hugo-theme-stack/exampleSite/config.yaml ./config.yamlcp -a ./themes/hugo-theme-stack/assets ./assets注意:当前版本中,Stack使用
.yaml配置文件,为了预防不必要的冲突,我们选择将构建 Hugo 时初始化的config.toml移除。rm ./config.toml配置主题
以你喜欢的方式打开位于站点根目录下的
config.yaml文件,该文件用于配置Stack主题站点的各项参数。详细参数的解释请参考 Hugo/theme:Stack ,此处仅介绍关键配置。如上文介绍的那样,这里至少要配置两个参数,既
baseURL以及publishDir。安如下提示所示,修改变量baseURL并添加变量publishDir声明。修改完毕记得保存。baseurl: https://yourname.github.io/hello-hugo publishDir: docs此处同样需要注意替换
yourname。注入魔法
执行
hugo更新编译状态,然后将更新信息推送至远程仓库,然后访问你的项目仓库,查看推送结果。# yaoqinse@LAPTOP-29FRT6FJ MINGW64 /e/_GithubProjects/myProfile/hello-hugo (main) $ hugo # yaoqinse@LAPTOP-29FRT6FJ MINGW64 /e/_GithubProjects/myProfile/hello-hugo (main) $ git add . # yaoqinse@LAPTOP-29FRT6FJ MINGW64 /e/_GithubProjects/myProfile/hello-hugo (main) $ git commit -m "introduce hugo-theme-stack" # yaoqinse@LAPTOP-29FRT6FJ MINGW64 /e/_GithubProjects/myProfile/hello-hugo (main) $ git push -u origin main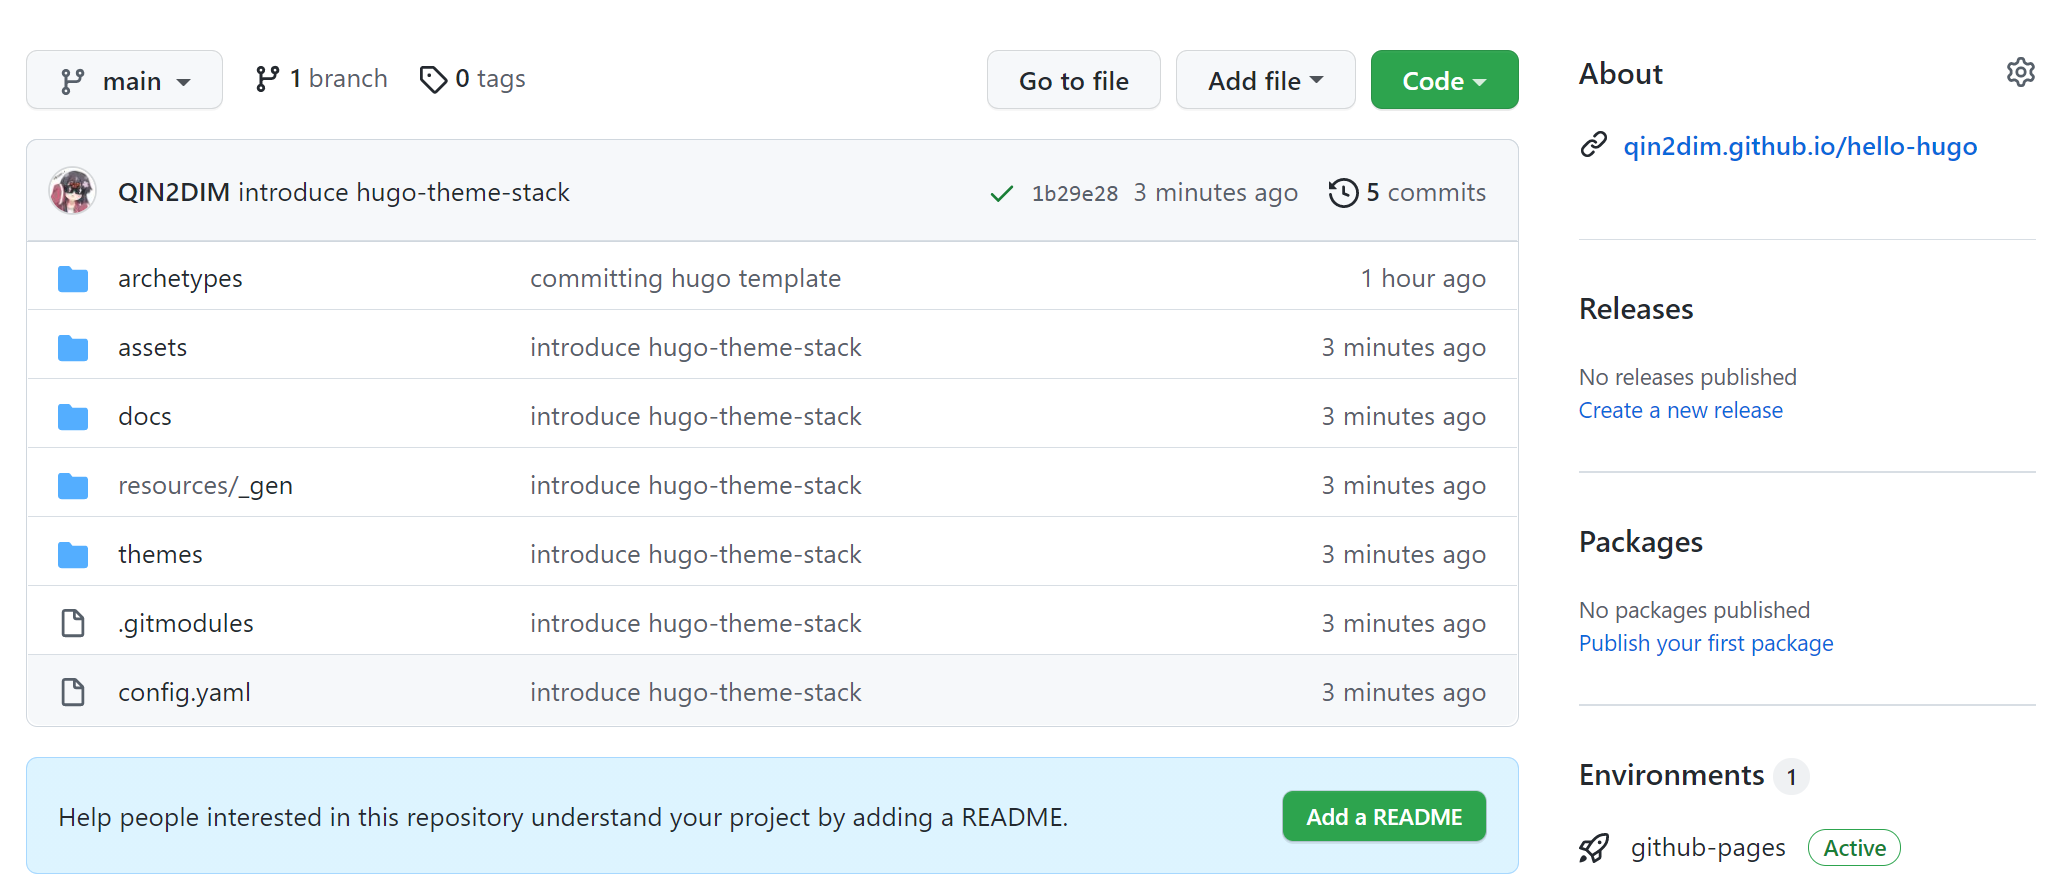
Hello World
访问https://yourname.github.io/hello-hugo,查看您部署的站点。您也可以预览作者按照如上步骤快速搭建的Demo Site。
可能会有的小伙伴觉得本篇博客的搭建过程比较啰嗦,目前此技术栈的构建已有成熟的解决方案几乎能在任何操作系统上实现hugo + github pages自动化部署。其实嘛- -作者认为“教程”是分享给其他人看的,需要拆分工作流,这样能让读者明确自己所在的位置,出了问题容易定位;若使用“一键脚本”,新手读者很难明晰其中的原理,很可能于后续的站点维护更新中举步维艰。
Conclusion
本篇博客详细阐述了如何在 Windows 平台上通过简单指令凭借Hugo + Github Pages技术栈快速搭建个人站点,并提供了Demo Site。作者后续会更新更多关于此技术栈的其他内容,帮助您美化,管理、升级个人站点。
如下为示例站点的目录结构,作者将以Blog写作为例总结此技术栈的实现流程,请注意,如下所有指令操作若无特殊说明,均默认在 hello-hugo 目录下执行。
"""
hello-hugo
 ├── archetypes
 ├── assets
 ├── config.yaml
 ├── content
 ├── data
 ├── docs
 ├── layouts
 ├── resources
 ├── static
 └── themes
 """
关于站点根目录下各个文件夹(work field)的详细介绍请阅读官方文档Directory Structure | Hugo (gohugo.io),此处仅在介绍工作流时涉及几个关键的文件夹。
关于此技术栈的工作流总结如下:
创建Blog
在站点根目录
hello-hugo下新建"blog",如hugo new post/blog.md,默认创建在~/content/post/blog.md。hugo new post/blog.md打开这个 Markdown文件,可以看见头部声名中
draft: true默认为草稿模式(不同主题规则不同),需要置draft: false,该篇内容才会被渲染出来,否则会被过滤。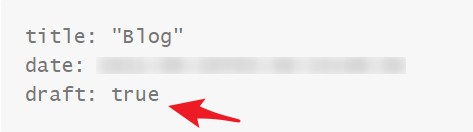
启动本地
hugo服务器在站点根目录
hello-hugo下创建本地服务器hugo server启动后根据打印日志查看入口,如
http://localhost:8745/hello-hugo/,端口号不一定与此相同,默认是1313,若有冲突则会随机更换。这里的文档都是热加载编译,我们对项目文件的更改将直接同步到本地服务上,如Blog的书写,配置文件的改动以及目录文件的调整等等。于是,我们编写的内容可以实时提现在站点上,方便修改调试。
缓存更新
当你的工作结束后,停止
local hugo-server进程。你的工作进度会被自动编译到publishDir变量指向的文件夹中(如本例的./docs)。当然你也可以在工作结束后手动更新缓存。也即你的每一个对 hugo 的更改,如果你想体现在Github Pages 中,一定不要忘了在 Push 之前更新一下缓存。后续文章中,作者将介绍如何使用
Github Actions在你 Push 后自动化更新publishDir下的文件,无需繁再 Push 前手动更新缓存,进一步偷懒。yaoqinse@LAPTOP-29FRT6FJ MINGW64 /e/_GithubProjects/myProfile/hello-hugo (main) $ hugo Start building sites … hugo v0.88.1-5BC54738+extended windows/amd64 BuildDate=2021-09-04T09:39:19Z VendorInfo=gohugoio WARN 2021/09/20 04:04:53 Search page not found. Create a page with layout: search. WARN 2021/09/20 04:04:53 Archives page not found. Create a page with layout: archives. | EN -------------------+----- Pages | 7 Paginator pages | 0 Non-page files | 0 Static files | 0 Processed images | 3 Aliases | 3 Sitemaps | 1 Cleaned | 0 Total in 183 ms资源推送
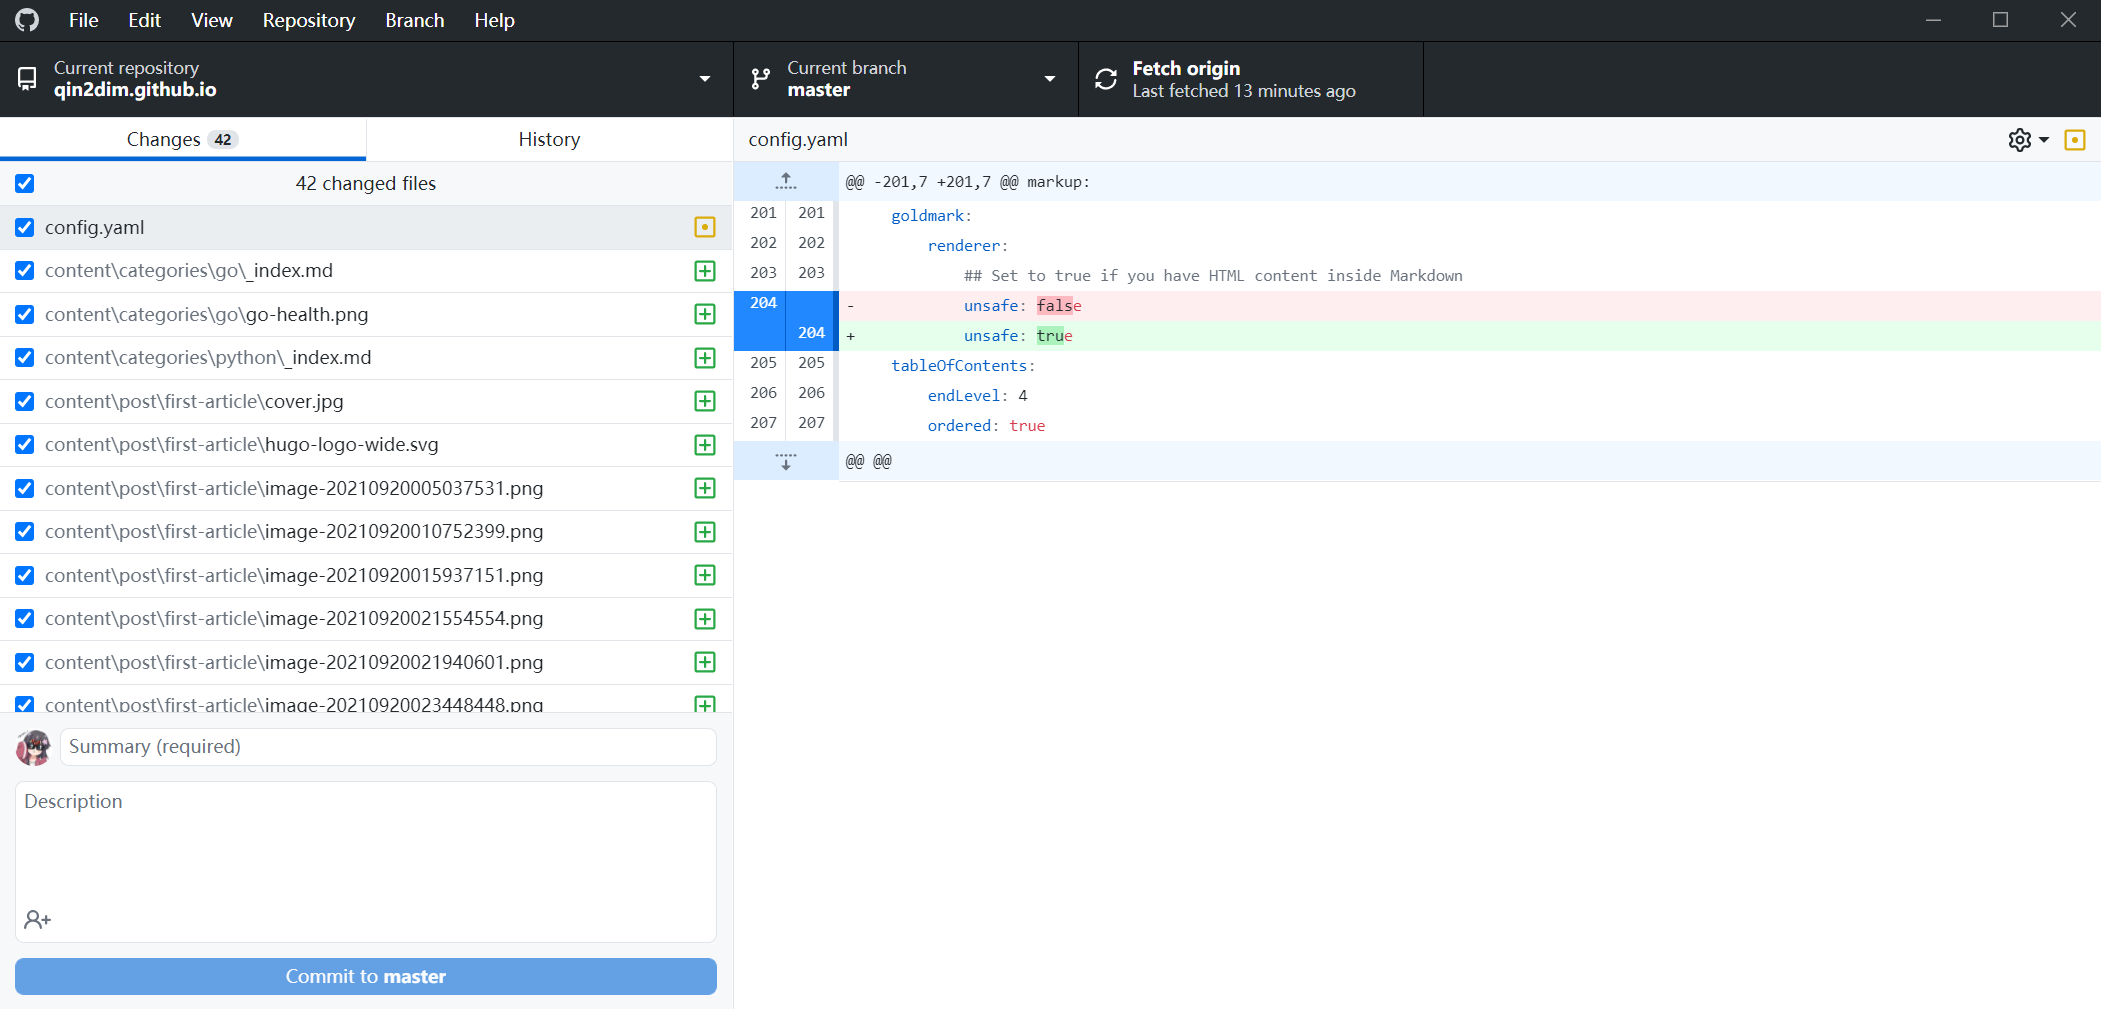
这里推荐使用 Github Desktop 推送仓库更新。自动扫描变更,一件推送,相比于每次更新都要手敲git代码方便很多。
若您缺少可靠的解决方案,那只能老实敲代码了:
git add .
git commit -m "description of this change"
git push -u origin main
查看更新
访问站点,查看推送结果。Github Pages 集成需要一点时间,如果你没能在推送后立即看到“改变”也不要慌,稍微等一会刷新一下既可。
同样,若你在本地调改动资源并 auto-rebuild 后,体现在站点上的内容并没有立即改变,可以先Ctrl + C停止进程,r然后执行下面的命令回收垃圾,并重新部署既可。
hugo --gc	# 垃圾回收
hugo server	# 重新启动本地服务