Overview
I know it’s a cliche to say that it’s a “very great pleasure”, but, being honest with you, it genuinely is.
Selenium 4 不仅对前代版本做了稳定提升,还带来了大量令人兴奋的新功能,这能让我们的测试编写起来更有趣,也能在运行时更加稳定。
Authentication
Selenium 4.0 的一个重要更新是 身份验证 能力。
在过去,我们一直能使用 Selenium 处理一些「登录」请求,譬如通过定位特征元素(如 Input )来控制 Driver 进行定位(如 find_element_by_xpath() )、输入(如 send_key() )、提交(如 click() )完成身份验。然而,我们使用这套工作流处理一些特殊框架的站点(如 basic or digest authentication)时效果差强人意。因此,我们在使用 Selenium 处理难以应付的登录要求时,总会在启动前携带 cookie。
上述情况将在 Selenium 4.0 时代有所改观。我们可以通过调用 register 方法来添加 「username」以及 「password」或是其他 Token 执行身份认证任务,而无需再繁琐地定位元素发送消息或是与人机验证勾心斗角,「验证」行为由 Driver 底层实现。
如下案例演示了新方法的功能实现:
- Java
// This "HasAuthentication" interface is the key!
HasAuthentication authentication (HasAuthentication) driver;

// You can either register something for all sites
authentication.register(() -> new UsernameAndPassword("admin", "admin"));

// Or use something different for specific sites
authentication.register(
  uri -> uri.getHost().contains("mysite.com"),
new UsernameAndPassword("AzureDiamond", "hunter2"));- Ruby
driver.register(username: 'admin', password: 'admin')当我们完成 add 添加操作后,每当站点要求或是 driver 加载出身份认证页面时,Selenium 会帮我们自动提供验证信息(如 username 与 password),这样的操作是隐式完成的。以往,我们可能需要单独开一条线程来应对随时可能出现的 「运行时身份认证」或是通过 「try…exception」机制主动捕获异常并调用相应的处理模块。
这个特性目前是基于 Selenium 4 的 CDP (Chrome DevTools Protocol)实现的,意味着此功能仅能运行在支持这个协议的浏览器上。值得一提的是,Selenium 旗下产品 WebDriver Bidi 的允许开发者在不支持 CDP 的浏览器使用这项功能,好消息是这个项目还未完整孵化出来,我们可以期待一下。
Relative Locators
相对定位器(Relative Locators)是一种基于「自然语言术语」的元素定位解决方案,开发者可通过诸如「上方」「下方」「左侧」「右边」等描述捕获那些「看得见但摸不着」的标记元素,这种描述可以适应 DOM 的变化。
这种方法背后的概念是允许开发者根据在页面上描述元素的方式来查找元素。更自然的说法是「find the element that is below the image」,而不是「find the INPUT inside the DIV with the “id " of “main”」 。通常,我们可以将此方案视为一种==基于视觉==的元素定位方法。
这套方法论最初由 Sahi 提出,这是一个极其强大的基于 低代码 实现的自动化测试平台,感兴趣的朋友可以了解以下。
我们以 Python 和 Java 举个例子,简要说明这个方案的强大之处。
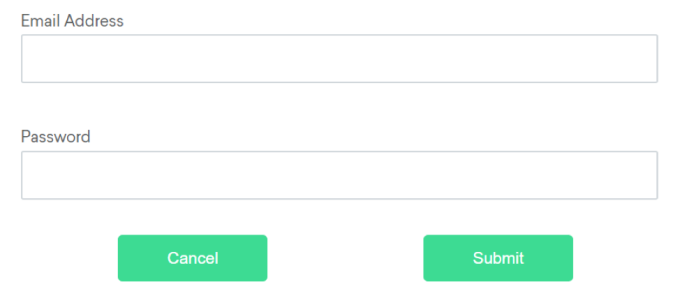
如下图所示是一个常见的登陆页面,我们现在尝试用新版本 API 定位页面元素。

Above
如上图是一个常见的登录页面,我们想找到位于密码字段上方的电子邮件地址字段。为此,我们通过其 id 找到密码字段,然后使用 relative locators 定位器捕获电子邮件字段。
- Python
from selenium.webdriver.common.by import By
from selenium.webdriver.support.relative_locator import locate_with
passwordField = driver.find_element(By.ID, "password")
emailAddressField = driver.find_element(locate_with(By.TAG_NAME, "input").above(passwordField))- Java
import static org.openqa.selenium.support.locators.RelativeLocator.with;
WebElement password = driver.findElement(By.id("password"));
WebElement email = driver.findElement(with(By.tagName("input")).above(passwordField));
Below
反过来,让我们定位密码字段,它位于电子邮件地址字段下方。
- Python
from selenium.webdriver.common.by import By
from selenium.webdriver.support.relative_locator import locate_with
emailAddressField = driver.find_element(By.ID, "email")
passwordField = driver.find_element(locate_with(By.TAG_NAME, "input").below(emailAddressField))- Java
import static org.openqa.selenium.support.locators.RelativeLocator.with;
WebElement emailAddressField = driver.findElement(By.id("email"));
WebElement passwordField = driver.findElement(with(By.tagName("input"))
                                          	.below(emailAddressField));
To the left Of
让我们考虑一下我们想要在「提交」按钮左侧找到元素的情况。
- Python
from selenium.webdriver.common.by import By
from selenium.webdriver.support.relative_locator import locate_with
submitButton = driver.find_element(By.ID, "submit")
cancelButton = driver.find_element(locate_with(By.TAG_NAME, "button").
to_left_of(submitButton))- Java
import static org.openqa.selenium.support.locators.RelativeLocator.with;
WebElement submitButton = driver.findElement(By.id("submit"));
WebElement cancelButton = driver.findElement(with(By.tagName("button"))
                                        	.toLeftOf(submitButton));
To the Right Of
现在我们将考虑相反的情况,我们希望找到「取消」按钮右侧的元素。
- Python
from selenium.webdriver.common.by import By
from selenium.webdriver.support.relative_locator import locate_with
cancelButton = driver.find_element(By.ID, "cancel")
submitButton = driver.find_element(locate_with(By.TAG_NAME, "button").
to_right_of(cancelButton))- Java
import static org.openqa.selenium.support.locators.RelativeLocator.with;
WebElement cancelButton = driver.findElement(By.id("cancel"));
WebElement submitButton = driver.findElement(with(By.tagName("button")).toRightOf(cancelButton));
Near
上文「适应 DOM 的变化」从何而来?我觉得 near function 是个非常重要的体现,它允许我们通过一定的规则指定所选取的元素周围 50px 以内的其他元素。小伙伴们首先想到什么?欸嘿我不说。官方文档中这一句不起眼的描述,可能在未来,成为万千依靠 Selenium 工作的工程师们实现财富自由的垫脚石。
回到话题,在这个案例中,我们可以通过先定位邮件标签,再通过寻找 input tag 的偏移量,最终定位邮件地址的输入框。
- Python
from selenium.webdriver.common.by import By
from selenium.webdriver.support.relative_locator import locate_with

emailAddressLabel = driver.find_element(By.ID, "lbl-email")
emailAddressField = driver.find_element(locate_with(By.TAG_NAME, "input").
near(emailAddressLabel))- Java
import static org.openqa.selenium.support.locators.RelativeLocator.with;
WebElement emailAddressLabel = driver.findElement(By.id("lbl-email"));
WebElement emailAddressField = driver.findElement(with(By.tagName("input")).near(emailAddressLabel));
Enhancement
如果你使用 Firefox 或是其他基于 Chromium 的浏览器,Selenium 4 还提供了强大的增强特性。
除了上文介绍的 Authentication ,Selenium 4 还添加了 Network Interception(Are you an HTTP 418?)以及一些常见执行请求,如更加高效的「等待 DOM 变更」的方法,或是查看 Javascript 错误的方法等等。
值得一提的是,这些提升大都是基于现有 API 打磨的,意味着我们原先引用的函数方法无需改动,而我们只需升级版本 如 pip install --upgrade selenium ,这些库函数将被自动替换(如果是要使用原先没有的新功能我们当然得改代码)。
Selenium Grid
Selenium 重构了 Grid ,使其完全支持分布式,能够运行于 Kubernetes 等现代基础设施之上。
重构后的 Grid 可以管理本地机器上的 Docker 容器,提取诸如独立的 Firefox 服务器之类的镜像,这样我们的基础设施维护工作就会变得轻松一些。
最后, Grid 更加安全,也更加易于管理。Selenium 改进了 Grid 的UI,将其置于 GraphQL 模型上运行,任何人都可以自由查询并使用该模型来创建自己的可视化或 Grid 监视器。开发者可以使用 VNC 与正在运行的会话(session)进行交互,从而更好地了解到正在发生地事情。
